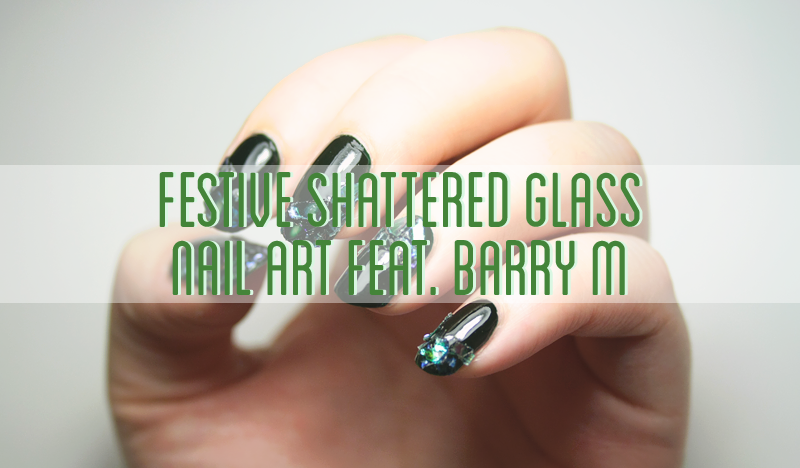
Festive Shattered/Broken Glass Nail Art feat. Barry M (Black Pistachio*)
So I guess you could consider this the first of my festive blog posts. I've experimented with broken glass/shattered glass nails before but never posted them over here so I thought I'd kill three birds with one stone and do a subtle festive mani, use Barry M Black Pistachio and show you my interpretation of the broken glass nail trend. I've been wanting to try out the new Black Gellys for a while (I've two others to show you) and since we are less than three weeks away from Christmas, Black Pistachio seemed like a natural choice for the first festive mani of the season!
So follow me under the cut to see more and ready about my trials and tribulations concerning this fecking glitter.
So here are the components of the look...

That's it, well apart from the prerequisite base and top coats but all you really need is your preferred polish colour and corresponding iridescent glitter. I ordered a twelve pack of different colours from Amazon and I'll tell you now, they're not the best for this look. They're a bit thick and harder to stick down on the nail without damaging the base colour.
I think these are really meant for gel polishes but the smaller bits of glitter stick down no problem. From far away, they look AMAZING but on closer inspection, they're not the most flawless but sure you'll see that in a second.

My previous broken/shattered glass nail art was with pastel colours and while from a distance, they looked great, looking closer you could see all of the imperfections. Going with a darker base, you can get away with being a bit more heavy handed but you can still spot mistakes if you know where to look. I'm not going to point them out to you LOL

In terms of technique, I started off by applying a peel-off base coat so ensure easy removal in a few days. Once dry, I used two coats of Black Pistachio. Waiting for that to dry, I organised my glitter, poured a bit into the top of the container so I had just a few to choose from at a time.
Once my base colour was somewhat dry, I put a coat of top coat over the entire nail and started to apply the glitter pieces to the nail. I would use a thinner top coat, like the Barry M one for this stage. Don't press too hard on the glitter or you will end up with spots where you can see the blank nail underneath but do try and secure it down with a bit of pressure. Apply small amounts of top coat to the areas you want to stick glitter to as the initial coat will probably dry before you complete the nail.
There's no particular pattern to follow in terms of placement, I just started off on the thumb and followed the movement of the glitter throughout the nails. You can be as uniform or as crazy as you'd like. Once finished, apply a second coat of top coat. I used Seche Vite for this second layer and leave to dry. VOILÀ you're finished!

It's not the fastest manicure, or the most practical but for a special holiday party or for the big day itself, it's a pretty cool looking manicure. If you're looking for a softer broken/shattered glass look then try and find iridescent cellophane. While the glitter wasn't exactly what I was looking for, I think it lends itself to this trend and adds a harder edge to the overall look.
In terms of the polish, I love a good hunter green and Black Pistachio takes hunter green to that ultimate level of near-black. It's a great alternative to black for this time of year that has the signature glossy finish we've come to expect from the entire Gelly range. It's available from Superdrug, Boots and Barry M's website for £3.99.
So what do you guys think of this broken/shattered glass trend? Like it or loathe it? Let me know in the comments below and be sure to subscribe, like and follow me on my social media sites, links can be found in the side bar, until next time :)
So follow me under the cut to see more and ready about my trials and tribulations concerning this fecking glitter.
So here are the components of the look...
That's it, well apart from the prerequisite base and top coats but all you really need is your preferred polish colour and corresponding iridescent glitter. I ordered a twelve pack of different colours from Amazon and I'll tell you now, they're not the best for this look. They're a bit thick and harder to stick down on the nail without damaging the base colour.
I think these are really meant for gel polishes but the smaller bits of glitter stick down no problem. From far away, they look AMAZING but on closer inspection, they're not the most flawless but sure you'll see that in a second.
My previous broken/shattered glass nail art was with pastel colours and while from a distance, they looked great, looking closer you could see all of the imperfections. Going with a darker base, you can get away with being a bit more heavy handed but you can still spot mistakes if you know where to look. I'm not going to point them out to you LOL
In terms of technique, I started off by applying a peel-off base coat so ensure easy removal in a few days. Once dry, I used two coats of Black Pistachio. Waiting for that to dry, I organised my glitter, poured a bit into the top of the container so I had just a few to choose from at a time.
Once my base colour was somewhat dry, I put a coat of top coat over the entire nail and started to apply the glitter pieces to the nail. I would use a thinner top coat, like the Barry M one for this stage. Don't press too hard on the glitter or you will end up with spots where you can see the blank nail underneath but do try and secure it down with a bit of pressure. Apply small amounts of top coat to the areas you want to stick glitter to as the initial coat will probably dry before you complete the nail.
There's no particular pattern to follow in terms of placement, I just started off on the thumb and followed the movement of the glitter throughout the nails. You can be as uniform or as crazy as you'd like. Once finished, apply a second coat of top coat. I used Seche Vite for this second layer and leave to dry. VOILÀ you're finished!
It's not the fastest manicure, or the most practical but for a special holiday party or for the big day itself, it's a pretty cool looking manicure. If you're looking for a softer broken/shattered glass look then try and find iridescent cellophane. While the glitter wasn't exactly what I was looking for, I think it lends itself to this trend and adds a harder edge to the overall look.
In terms of the polish, I love a good hunter green and Black Pistachio takes hunter green to that ultimate level of near-black. It's a great alternative to black for this time of year that has the signature glossy finish we've come to expect from the entire Gelly range. It's available from Superdrug, Boots and Barry M's website for £3.99.
So what do you guys think of this broken/shattered glass trend? Like it or loathe it? Let me know in the comments below and be sure to subscribe, like and follow me on my social media sites, links can be found in the side bar, until next time :)

Comments
Post a Comment
I love any and all comments on my blog...except spam, no one likes that, so don't be that guy!